Wednesday, 24 August 2016

Navy Tile Print Shirt Dress


One of the challenges of being a mum, aside from having a little person attached to you 24/7, is finding the right clothes. As a mum who is breastfeeding, where boobie access in a garment is paramount, this becomes even more difficult. One solution is a shirt dress.


I've had this fabric sitting around in my stash since I made a trip to Walthamstow market some time last year. It was always intended for a shirt dress,to add to my work wardrobe. I originally had the McCalls M6696 picked out following on from the black floral sleeveless version I made last year. However, since having a baby my waist mesurement is no longer the same, so I couldn't use my already cut out pattern pieces.


I instead chose to make this shirt dress by Threadcount. Ironically, I actually received this in my May subscription of Love Sewing magazine, which was brought into the hospital for me after I had given birth. I wasn't very sold on the image on the pattern, as I don't usually go for such a boxy shape with no fitting at the waist but decided to give this a go based on the photos in the magazine.  
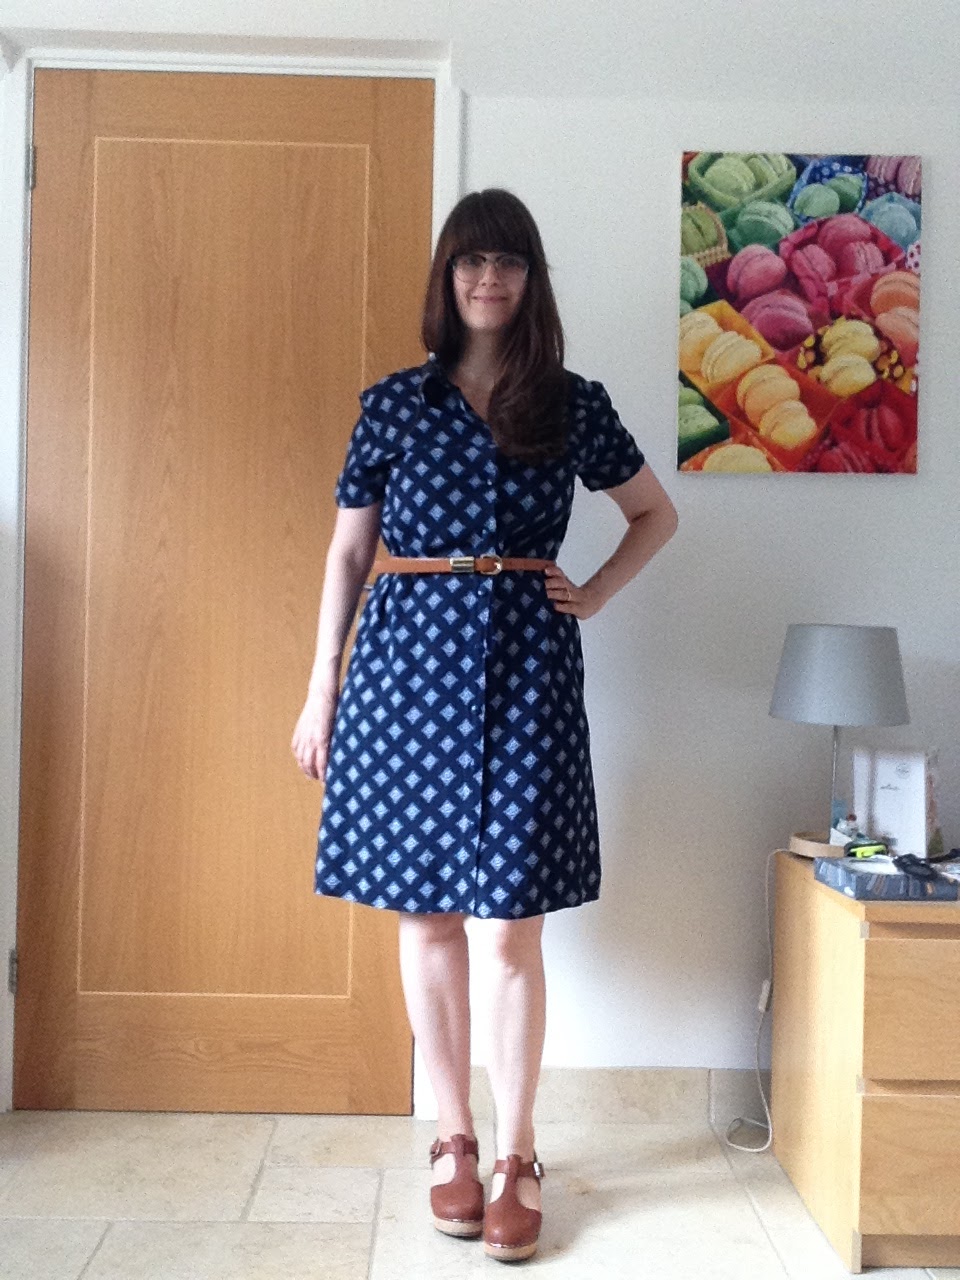

I cut a size 12 on top, grading up to a size 14 at the hips and skirt. The fabric was some sort of viscose/poylester which was easy to cut out and work with. The instructions straight forward to follow and as I already have a fair amount of experience making shirts and shirt dresses, I was already familiar with the construction process of making a collar.


I made a few changes to the original pattern. The main one being that I shortened the sleeves, to make this dress summer appropriate and also a quicker make (no cuffs)! I shortened the length of the dress to make it knee length and also omitted some of the topstitching around the collar, as I couldn't be bothered. I used navy blue geometric printed buttons which I bought from my local fabric and haberdashery shop; I thought they matched the tile print nicely.


Although you can't see it, the construction of this dress went very well. I finished all the inside seams using my overlocker foot on my machine and the inside collar is slipstitched. My technique for sewing the collar and stand has really improved and is much more symmetrical now. I'm also pleased with the button placement on this dress.


I'm pleased with the finish of this dress. It looks nice on, it fits well and is comfortable to wear. I wear it with a belt in order to pull it in at the waist and this makes it feel more fitted. I wore this dress recently on a trip to London to go to Marcus Wearing's restaurant.  

I'm still very much liking shirt dresses, they feel comfortable and stylish and I love making them. I really want to have a go at the Cami dress by Pauline Alice or the Vintage Shirt Dress by Sew Over It.

Monday, 22 August 2016

Turquoise Bexley Tunic Top


Whilst waiting for my little boy to be born, way back in May, I occupied myself by sewing clothes for me to wear post-pregnancy. One of these is this beautiful turquoise tunic. 

The pattern is the Bexley Tunic from Issue 26 of Love Sewing Magazine. I wasn't that sold on the pattern to start with as it seemed a bit mumsy (ironic I know!) but I soon realised how useful this top would be post pregnancy. 


The fabric was once from my very small stash. I had previously blogged about this mystery turquoise fabric; one given to me by my Mum and another turquoise remnant I bought. 

I cut a size medium, based on my pregnancy bust size (I correctly assumed my increased bust size would still be around post-pregnancy). It was straight forward to construct, with a gathered front yoke and biased bound neckline, techniques which were not new to me. The fabric is quite delicate and did tend to fray quite a bit so I tried not to handle the pieces too much.  


The problem is, it's wayyy too big!!


I tried this top on whilst still pregnant and it fitted me then... I knew it was going to need some adjustment once I had slimmed down. There is a lot of room around the bust and hips.

Before

After fiddling around a bit with pinning and trying on, I had to take 3 inches from each side hem and taper this up to the arms. It has left the hem slightly twisted and a tuck in the back hem, as I had to ensure that the front and back hem met up.

After pinning

I do really like some of the features of this top- the curved front yoke and the curved back hem. It fits ok, however, I really don't like how short it is across the front and the volume around the front. I feel that this makes me look bigger than I actually am. I haven't actually worn this yet as I don't feel that confident when I put it on.


I have another version of this top planned in some chambray and blue stripey cotton I have left over. I'm going to have a go at removing the gathering at the front yoke and re-designing the front hem so that it is curved in the same way as the back. Wish me luck!!

Friday, 19 August 2016

Cordelia Maternity Camisole


Long time, no post! Motherhood is keeping me busy- I've fitted in some sewing but no time for blogging. Here's a make from my pregnancy that I've been waiting to post!  


You might have seen that Zoe from 'So Zo...What do you know?' has recently released a new sewing pattern, the Cordelia Camisole Pattern. I was lucky enough to be selected as a pattern tester during the final trimester of my pregnancy.


The camisole uses only 1m of jersey fabric and approx 2m of fold over elastic. I made two versions. For the first I used a beautifully drapey silver slub jersey from Minerva Crafts which I paired with some silver fold over elastic by Prym.

The pdf pattern was easy to put together - I don't often use pdf patterns but this one didn't consist of too many pages. I cut a straight size 12 to accommodate my 37 week pregnancy bump.


I used a rotary cutter and tin-can weights to cut out the pieces, which helped keep this drapy jersey flat. It was very quick to cut - there were only four pieces including the optional bust support panel.
 

I decided to include the bust panel as the jersey was a bit see through. This has a bottom edge which is finished with fold over elastic. This was the first time I had used fold over elastic and I used a 3 step zig zag stitch which gives a nice finish. I didn't actually test it at all - I recklessly went straight for it and it worked out really well - no where near as hard as I thought!  


The only problem is that because I included the bust support panel and used up some of the fold over elastic, I didn't have enough for the straps. D'oh! So unfortunately, this still lingers in my unfinished objects pile, which is a shame as I love the fabric and it fitted so nicely!

A pic of my 38 week bump in my half-finished camisole 


So after my first attempt at the Cordelia camisole, I immediately (the same day!) began cutting out my second version. For this version, I had picked a red and blue stripy jersey also from Minerva Crafts and used some red fold over elastic from the same supplier.


This was slightly harder to cut as I tried to match the stripes as best as I could. I have decide that this is my preferred method for cutting fabric, as it is so quick and accurate. Unfortunately, due to the gathers at the side of the camisole it meant that when constructed the stripes did not completely match up but was still worth attempting. 


I found the construction easier second time around and this came together very quickly. I chose not to cut out the bust support panel this time, to ensure that I had enough fold over elastic. The fold over elastic straps were very easy to create and I liked the fact that I could adjust the length of them before I secured them to the back.


The fit of the camisole is good- it fits well over my bump. I would recommend using jersey with quite a bit of stretch to get the most out of your garment - this stripey jersey is not too stretchy and unfortunately didn't fit for very long, due to a rapidly growing bump.  

So, if any ladies out there are expecting, or knows anyone who is, I would highly recommend the Cordelia Camisole pattern. It was so so easy to put together, uses less than 1m of fabric and only 2.5m of fold over elastic. The techniques are easy, even if you have never sewn with jersey fabric before so this is a great quick project. 

I wrote this post before my baby was born, and looking back now I can't imagine being that big. It seems strange to see myself looking pregnant in pictures. My next post is also something I made pre-pregnancy. 

Monday, 25 July 2016

My latest creation...

Long time, no post! I've been rather busy recently and most of May and all of June seem to have slipped by and it's now mid July. I can't say that I've no idea where the time has gone because it's all down to this little fella ...


Introducing my latest creation, baby Arthur. Arthur was born on the 16th of May at 1.11am after approximately 40 hours of labour. Yes .... 40 hours, I know!! I'll spare you the gory details but it was relatively painful and didn't quite go to plan. However, it was totally worth it and it's true what they say - you forget the pain straight away and I would definitely go through it all again.

It has taken me quite a while to recover and I finally feel more like myself. Life with a newborn has been an adjustment but I'm getting used to reduced sleep, being covered in poo/wee/sick and eating at the speed of light when he's crying!

Arthur and I enjoyed the Sewing Bee. As I can no longer watch anything past 9pm (our official bedtime) I recorded it and watched at my leisure during the day. A massive well done to Charlotte for winning, she was my favourite all along and I was also pleased to see Jade in the final as I think she has a natural instinct for sewing. There were definitely some interesting challenges in the series and it has inspired me to maybe have a go at refashioning some garments in the future.

I have a project to blog about that I made pre baby and another project currently on the go- sewing with a newborn is not impossible but tricky. So watch this space!

Wednesday, 11 May 2016

GBSB 2016


It's back!! I am super excited that the fourth series of The Great British Sewing Bee is back next week. The first episode 'basic construction' airs on Monday 16th May at 9.00pm on BBC2.

This series features a change in judges, with Patrick Grant being joined by Esme Young from Central St. Martin's. There are 10 contestants and there will be 8 episodes. The format seems to be the same, with three challenges: a construction challenge based on everyone using the same pattern, a creative challenge where contestants need to adapt an item of clothing and the made to measure challenge where contestants have to fit to a live model.

I'm very much looking forward to seeing how the contestants work and the different challenges they face. I'm going to ensure that I have this on record so I don't miss any!  

Anyone else looking forward to GBSB's return? 

Turquoise Sleeveless Blouse


I'm still here! Baby Gibbs still hasn't made an appearance - I'm currently three days overdue, so it could happen at any time. In the mean time, I've been keeping busy with some sewing.

One of the projects that has been in my sewing queue (yes, I've got one!) for a while is a second version of my red floral sleeveless blouse. This blouse got a fair amount of wear last summer, before I became pregnant. The pattern is a version of the 40's style blouse pattern in Gertie Sews Vintage Casual by Gretchen Hirsch.


I brought this gorgeous turquoise and pink floral print fabric from a trip last year to Walthamstow at the same time as the red floral fabric. It has very good drape and I always envisioned it as a sleeveless summer blouse.


Due to my current condition, I had to work slowly on this project. I actually started this during the Easter half term and then finished it last week over several days. I have been sewing a few seams, etc. and then having a rest!


I am pleased with the finished blouse. I mistakenly interfaced both the under and upper collar, but couldn't be bothered to cut a new under collar so went with it. This has resulted in a slightly stiffer collar, which I actually don't mind as it seems to hold the shape better.  


The inside of this blouse is also very neat. I am becoming more confident with using bias binding to finish arm holes and love the neat finish this gives the blouse. I also paid more attention when stitching up the darts of this blouse to ensure that they aren't wonky like my previous version!!


I was unsure about my choice of buttons for this blouse. My first instinct was to go with hot pink contrasting buttons but failed to find any the right shade. I also had difficulty finding the proper shade of turquoise and ended up with this slightly lighter blue shade. I don't hate them but I'm not totally in love with them either. I guess I could change them at a later date if I find any better ones!


The only glaring worry I have about this blouse is obviously that it doesn't currently fit me! I tried it on and it fits nicely around the shoulders but not around my very, very large bump. The idea is that once I have given birth and I am beginning to get back to normal this blouse should fit nicely for the summer. Another bonus is that it is button down so should be good for nursing too!

Have you started sewing for the summer?

Wednesday, 4 May 2016

Happy Camper Socks


I'm currently on my third week of maternity leave and no signs of baby Gibbs yet! My due date is this weekend so baby could make his or her appearance at any point really. It's frustrating that I could have another 2 more weeks after this weekend if I go overdue...

Anyway, I am currently in the process of finding things to keep me occupied; there is only so much cleaning and folding of tiny person clothes a woman can do! I have found that sewing is somewhat demanding on my tired and uncomfortable body but knitting is great!

This week I have finally finished my very first pair of socks!

For Christmas I was given a ball of Sidar Heart and Sole Sock Yarn; this colourway is called 'Happy Camper'. I am not particularly confident in my knitting skills and would never have chosen this intermediate project- knitting socks looks so difficult and I've always thought it was a bit pointless considering how cheap you can buy socks.


The yarn band came with instructions for how to knit a pair of socks. I didn't get round to starting this project until going we went on holiday to Spain in February. I previously blogged about my progress with these socks and how surprised I was at how enjoyable I found knitting these socks.


The yarn knitted up a dream and I loved watching the stripes appearing in my work. I found this project challenging enough to keep my interest, but no where near as difficult as I would have expected. I used a set of KnitPro Symfonie Double Pointed wooden needles, which apart from being beautifully multicoloured, were smooth to knit with and well worth the investment. Being wooden, this also meant that I was able to take them in my hand luggage on the Airplane on holiday.


I finally finished the second sock yesterday and am so please with the finished pair. There aren't many obvious mistakes and I have improved my skill with picking up the inevitable dropped stitches. I didn't bother matching up the yarn when starting, so the stripes don't match up but I don't mind.


 I am particularly please with the heels and love the ribbed effect!


So, my very first knitted and wearable garment!! I definitely see some more socks in my future, no that I have got the hang of knitting socks and depending on how wearable these end up being. I have a feeling they might not get much use as we are approaching summer!