Saturday, 20 June 2015

Moneta No. 2

Hello, all. I've really got the sewing bug at the moment! During the past week I have been squirrelling away working on my second Colette Moneta dress.


The fabric I have used is a royal blue jersey knit that I bought at the same time as the black stripy jersey I used for my first Moneta. The fabric is lovely and silky with just the right amount of stretch. I decided this time to make version three with elbow length sleeves.

Following on from my first Moneta dress I made some changes to the fit. The problem with my first version is that it is was too wide for my shoulders. This means the shoulders slip off and there is excess fabric around the neckline.  Not a great look. I found instructions on how to adjust for narrow shoulders in a book called Dressmaking by Alison Smith.


I didn't really want to start cutting up my beautiful Colette pattern and I couldn't be bothered to trace out two new pattern pieces. What I did was fold a dart into the front and back bodice at the neckline before cutting. I measured the width of the top of the fold and the length and position to compare the front and the back.


It worked!


I am much happier with the fit of the bodice. The shoulders fit properly without slipping off and it is much more comfortable to wear. Whilst I have made some improvements, it's still not a perfect fit just yet - there seems to be some bagging around the sleeves. I think I actually prefer the short sleeved version of this dress.

I wanted to try my overlocking foot out on the my new machine. I sampled several different stitches on scrap fabric and also tested my twin needle. In the end I went for the basic overlocking stitch, set to the largest width and length settings, to sew seams and finish the edges at the same time.


I haven't yet managed to get the topstitching quite correct. For some reason I keep getting skipped stitches. I'm also having some tension issues with the new machine, if I lower the tension it skips loads or if I increase it I end up with a raised channel between the stitches. I did manage to hem the neckline and sleeves using my twin needle but struggled when testing for the hem. In the end I accepted a temporary defeat and hemmed the skirt using a zig zag stitch. It doesn't look anywhere near as good as hemming with a twin needle but it's ok for now!


The gathering was also easier the second time around - you can see in this photo it's much more even than my previous attempt. I followed the Moneta Sewalong on the Colette Blog, but actually divided the elastic into eighths and matched to the notches on the skirt. This made it so much easier to get the elastic stretched evenly. Only one mishap, where I somehow managed to stretch the elastic so much is snapped!! Oops!


I've definitely enjoyed making both my Moneta dresses. I have become much more confident in sewing with knit fabric and even have plans to try some t-shirts to add to my wardrobe. I'd also like to try the sleeveless Moneta dress, although the lining scares me slightly!! 

And here's a little sneaky peak of my five new nail polishes ...


... may have gone a bit overboard but the colours are gorgeous!! 

What is on your sewing table at the moment?

Thursday, 18 June 2015

Unfinished Projects

During the previous week, I was sorting out my stash of sewing gear when I came across some unfinished projects. I'm generally quite good at ensuring that I finish a project before starting a new one. But for various reasons I currently have three unfinished projects waiting around to be completed.


I only have one unfinished sewing project - the Mimi blouse from Love at First Stitch by Tilly Walnes. As you can see, the pieces are already cut out ready to be stitched together. I chose a black poplin fabric for the main part of the blouse, with a cream poplin for the collar and cream piping on the front and back yoke by the gathers. I never got round to beginning sewing, because I think I have gone off the idea of a black and cream blouse! I might re-cut the collar in black and omit the piping so the blouse would be completely black.


I had completely forgotten about this piece of knitting! This was languishing away in a box, half completed. The needles and yarn were a christmas gift from my parents about 4 years ago. I started knitting the scarf soon after but have never kept it up for long. One of the reasons for this is that I don't really like the colour of the yarn- it's a weird neon pink and red colour. It's about 2/3 of the way finished, so I really should attempt to finish it now that my knitting speed has improved. 


This is my most recently abandoned project. It's a stuffed knitted owl that I started during my holiday in Spain at Easter. I bought the yarn and required bamboo needles as part of a set with a magazine at the Airport. Did you know that you can't take knitting needles in your hand luggage, but you can if you buy them at the airport? Anyway, the pieces are all completed but I haven't actually gotten round to sewing it all up yet.

I'm hoping that by outing myself and posting them here I can force myself into completing these projects. After some research I have found that unfinished projects are quite common in the sewing and knitting world and are often called UFO's (unfinished object) or WIP's (work in progress).

Do you have any UFO's?

Tuesday, 16 June 2015

Going Digital ...


 It's official. I've gone digital ... introducing my new sewing machine .... the Singer Confidence 7470.


I took delivery of the machine last Friday and spent a very enjoyable evening setting it up and testing it out. There was nothing really wrong with my previous machine. My parents brought me a Singer Promise 1408 as a birthday present about 2 years ago, not expecting that my sewing hobby would take off like it has. Whilst it still works perfectly fine, there are some things which I found frustrating, such as a limited number of stitches and no measurements on the base plate. After hearing me moan about it yet again, my husband finally convinced me to treat myself and buy a new one.


I decided to go for another Singer machine as I already have a number of presser feet for the singer machines and this one comes with a 15 year guarantee. I chose this machine in particular for the number of stitches it does. You can see from the chart above, that it does a whopping 225 stitches, including 7 different types of button holes, basic, stretch and loads of decorative stitches. It can even embroider letters! I was particularly on the look out for the stretch and overlocking stitches.

Some of the stitches on my new machine ... not sure what happened to the one in the middle but it massively puckered the fabric!


There are some features of this machine that I really love. It has a top loading 'drop and sew' bobbin system- no more messing around with bobbin cases- and an automatic needle threader. I'm still getting used to all the functions but so far they all work very well and have been really straight forward to learn. I especially like the measurements (in inches and mm) on the baseplate, which make sewing to a specific measurement much easier. 


The digital screen and buttons are really straightforward and easy to use. The bottom row has buttons for frequently used stitch settings- a very useful shortcut. I also like the twin needle button, which automatically adjusts the machine when your using a twin needle. There seems to be loads of other settings and functions which I have yet to discover, such as the one step buttonholes, but so far I am pleased with the machine. 


I ordered the machine online from singerdirect.co.uk. My machine is an ex-display model, so I got it for £299, a reduction on the usual price of £329. Its in almost perfect condition for an ex-display model and it doesn't look like it's ever been used. With my machine I also received a free set of 24 reels of thread and a three pairs of scissors, always handy to have!


However, although the website and company is completely legit, I received no confirmation email and after the money was taken from my account I got extremely worried it was a dodgy site. After a week with no email or delivery, I called their website and spoke to some really helpful people.

They tracked my order and called me back to let me know that the delivery company had tried to deliver it three times ... all times in the morning when my mother-in-law was out walking the dog!! I arranged to have my husband collect it at the depot the next day and so I got the machine in the end. Had someone been home to collect the machine I would have received it within 2 days of ordering - a very speedy service.

I feel very lucky to be able to purchase this machine. I wouldn't usually spend so much but I envision myself using the machine for many many years to come, so I think of it as an investment.

What machine do you have?

Sunday, 14 June 2015

Stripy Moneta Dress

Hello everyone, I'm finally sharing with you a make I made aaaaages ago! In fact I finished my version of Collette's Moneta in time to take on holiday to Spain at Easter but never got round to sharing details on my blog. And here's a photo of me wearing it last weekend- my very first photo of me on my blog!


The Moneta dress has been a fantastic addition to my wardrobe. This black and white version not only goes with everything but is ridiculously comfy. So comfy in fact, it almost feels like I'm wearing a nighty! I have worn it almost every weekend since I have made it and it always seems to go back on straight after it is out of the wash. 


I blogged about my search for jersey fabric back in March. The fabric was brought from a local shop in Tunbridge Wells, with the intention of making a Moneta dress. I have no other experience with knit fabric but this fabric was beautiful to work with. No fraying as you would expect from jersey and the seams pressed very neatly.

I decided to make version three of the dress, with short sleeves, since I was planing on wearing this dress on holiday. I followed a guide to cutting knit fabric by Tilly Walnes from Tilly and the Buttons, using clips and weights and cutting out using a rotary cutter. Although the actual cutting out didn't take long at all, lining up the stripes was a bit of a nightmare. Again I used this guide from Tilly on cutting out stripy fabrics. It was my first time sewing with a striped fabric and this was trickier than I thought!


The instructions for the pattern were really easy to follow. Since my Singer Promise machine only has a (very) limited number of stitches I experimented with some scrap jersey fabric, settling on using the smallest zig-zag stitch for the seams as this seemed the most stable when the fabric was stretched. Although it wasn't necessary as the fabric didn't fray, I used my overlocking foot and the widest zig-zag to finish the seams. To finish the neckline, sleeves and hem I used a twin needle.


Overall, the construction of the dress has went well. I used Framilastic to gather the waistband of the skirt, which was incredible fiddly. The gathers are ok, but are not perfectly even, so hopefully this is something that I will be able to improve with practise. I did manage to match up some of the stripes in the fabric quite successfully - those at the shoulders where the sleeves join and also at the bottom of the skirt. 


However there is an issue with the fit of the dress at the shoulders. You can see from the second picture above that the scoop of the neckline is really wide on me. I am quite petite on top, but the shoulders seem to hang from me (so much so you can see my bra straps!) and I am able to gather quite a lot of loose fabric around the shoulders. I definitely need to look into making this narrower across the shoulders in future versions, although I have absolutely no idea how! 

I'm really pleased with how well this dress has turned out. There were many firsts with this project: my first time sewing with knit fabric, sewing stripes, sewing with elastic AND my first time sewing pockets!  I will definitely be making more Moneta dresses - in fact,  the royal blue fabric I had picked out for a t-shirt is now ear marked for another Moneta.

What have you been sewing recently?

Tuesday, 9 June 2015

My Sewing Space

Hello. Hello. Hope everyone is having a good start to their week?

I wanted to show you my new sewing space.


My husband has recently sold his desktop computer and has allowed me to take over his office. This means that I now have a permanent space to house my sewing paraphernalia. Great, no?


I'm quite excited to have a permanent desk space to allocate to my sewing. It's admittedly a very small narrow office just off our bedroom, only really 1.5m x 2m, but the desk runs along the length of the room so there is plenty of space to lay out pattern pieces. I've got my trusty Singer Promise out of hiding and am now able to keep my sewing box in there too.  


I've also had a major sort out of all my patterns and fabrics, which are currently stashed in boxes underneath my bed. I have two files filled with my sewing patterns stored neatly and all my various sewing and knitting books and magazines are now neatly lined up in one corner.

I'm really pleased to have a permanent place to sew. This means that I no longer have to worry about packing everything away at the end of every day or project and I'm hoping this will lead to my becoming more productive.

Where do you sew? Do you have a permanent space or where do you keep you sewing equipment when it's out of use?

Saturday, 6 June 2015

Black and White Bow tie

I made a bow tie!! I am typically a selfish sewer and rarely make garments for others. My father-in-law asked me to make him a bow tie to wear to a black tie event. Specifically, he wanted a black and white, almost checkerboard effect. The idea is that each side of the bow is split into half with one part being white, the other black. The bow behind the front bow would then have the alternate colours. Sounds simple, but in practise this is very complex!!


I started by googling Bow Tie patterns and came across the David 008 Bow Tie Pattern by BurdaStyle. I chose this pattern as the Bow Tie is adjustable - none of the men in my family actually know how to tie a bow tie, so this was ideal as the bow on the front is fixed and the neck is adjustable. 

David 008 Bow Tie Pattern by BurdaStyle

After printing and piecing together the pattern, I firstly made a toile of the basic shape of the bow tie. This allowed me to practise tying a bow and to work out how to split the pattern to get the checkerboard effect I was after. Learning to tie a bow tie was challenging - I got it spot on the first time I tried, but the subsequent tries were not as successful. Practise makes perfect!  


I then split the pattern into parts according to colour and added seam allowances so that the bow part of the tie could be pieced together. In total there were 10 pattern pieces! This project did take a while to cut out, which was not helped by my fabric choice. 

After investigating my father-in-law's current selection of 3 bow ties (he goes to a fair few black tie events!) I decided that a satin fabric would give the best look for the bow tie and chose a silky satin dress fabric in black and white from Oh Sew Crafty. I didn't want to spend too much on the project in case it went wrong. The fabric was a good quality for the price but frayed horribly when cut, making it a complete pain to work with.


The pieced together parts of the bow tie came together nicely but some of the shape of the bows is slightly distorted. I think this is either due to the fabric shifting when cutting or perhaps overzealous pressing?

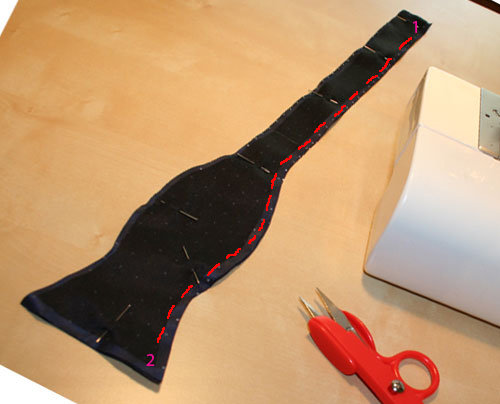
I ran into two major difficulties when making this bow tie. The first one was when turning the bow tie halves right side out. The idea is that you sew around the perimeter of the bow tie, leaving the small end open. You then turn it right side out by feeding it through the gap (Check out the picture below). Sounds easy, no?
Step 2 from the David 008 BurdaStyle Pattern instructions
In reality, this was not as easy as it seems. Not impossible but definitely tricky and I did have to walk away and come back to this at one point. The second difficulty came when I tried to work out how to get the adjustable clips onto the bow tie. This was mostly my own fault as I bought the wrong set of clips (adjuster and hook closure) so the ones I had were too small for the width of the neck band. In case anyones interested you need a 19mm bow tie set like this one from Calico Laine.


In the end I had to fudge the fitting by attaching a piece of elastic to one end and fixing the hook closure to the other. Although it certainly doesn't look pretty and contains some of the worst hand sewing I have ever done, it works.


I forced my husband into modelling it for me but I'm not sure that it quite matches his shirt! 

Overall I am really pleased with how this has worked out for a first attempt. I did leave myself very short of time so this has been rushed at points and whilst there are parts of the construction of the bow tie that are not perfect, I think on the whole it looks great. My father-in-law has proudly worn it to his event this evening, so we will see was that feedback is tomorrow!

Anyway, I hope everyone is enjoying the glorious weather we are having. I'm off to enjoy the remainder of the sunshine with a nice chilled drink and some homemade pizza. 

Monday, 1 June 2015

Pattern or Fabric first?

I've never been the type to fall in love with a fabric. I see fabrics that I really like but I never purchase them without a specific pattern in mind. I definitely choose my patterns first and then search about to find the perfect fabric. Partly this is down to economy and a lack of space for a stash of fabrics.

Most of my fabric purchases are online, although I have a favourite fabric shop, World of Sewing, in Tunbridge Wells. This week I've spent a lot of time doodling about on the internet, online fabric shopping. One of my favourite haunts is Oh Sew Crafty, which has an amazing array of good value fabrics.


I seem to be leaning towards floral fabrics at the moment. In particular I love the yellow and pink floral print with the black background. Once I have worked my way through my current list of projects, I intend to sew some pretty floral dresses and blouses for the summer.

But first I'll have to choose some patterns! Any suggestions?

How do you choose your sewing projects?