Tuesday, 9 June 2015

My Sewing Space

Hello. Hello. Hope everyone is having a good start to their week?

I wanted to show you my new sewing space.


My husband has recently sold his desktop computer and has allowed me to take over his office. This means that I now have a permanent space to house my sewing paraphernalia. Great, no?


I'm quite excited to have a permanent desk space to allocate to my sewing. It's admittedly a very small narrow office just off our bedroom, only really 1.5m x 2m, but the desk runs along the length of the room so there is plenty of space to lay out pattern pieces. I've got my trusty Singer Promise out of hiding and am now able to keep my sewing box in there too.  


I've also had a major sort out of all my patterns and fabrics, which are currently stashed in boxes underneath my bed. I have two files filled with my sewing patterns stored neatly and all my various sewing and knitting books and magazines are now neatly lined up in one corner.

I'm really pleased to have a permanent place to sew. This means that I no longer have to worry about packing everything away at the end of every day or project and I'm hoping this will lead to my becoming more productive.

Where do you sew? Do you have a permanent space or where do you keep you sewing equipment when it's out of use?

Saturday, 6 June 2015

Black and White Bow tie

I made a bow tie!! I am typically a selfish sewer and rarely make garments for others. My father-in-law asked me to make him a bow tie to wear to a black tie event. Specifically, he wanted a black and white, almost checkerboard effect. The idea is that each side of the bow is split into half with one part being white, the other black. The bow behind the front bow would then have the alternate colours. Sounds simple, but in practise this is very complex!!


I started by googling Bow Tie patterns and came across the David 008 Bow Tie Pattern by BurdaStyle. I chose this pattern as the Bow Tie is adjustable - none of the men in my family actually know how to tie a bow tie, so this was ideal as the bow on the front is fixed and the neck is adjustable. 

David 008 Bow Tie Pattern by BurdaStyle

After printing and piecing together the pattern, I firstly made a toile of the basic shape of the bow tie. This allowed me to practise tying a bow and to work out how to split the pattern to get the checkerboard effect I was after. Learning to tie a bow tie was challenging - I got it spot on the first time I tried, but the subsequent tries were not as successful. Practise makes perfect!  


I then split the pattern into parts according to colour and added seam allowances so that the bow part of the tie could be pieced together. In total there were 10 pattern pieces! This project did take a while to cut out, which was not helped by my fabric choice. 

After investigating my father-in-law's current selection of 3 bow ties (he goes to a fair few black tie events!) I decided that a satin fabric would give the best look for the bow tie and chose a silky satin dress fabric in black and white from Oh Sew Crafty. I didn't want to spend too much on the project in case it went wrong. The fabric was a good quality for the price but frayed horribly when cut, making it a complete pain to work with.


The pieced together parts of the bow tie came together nicely but some of the shape of the bows is slightly distorted. I think this is either due to the fabric shifting when cutting or perhaps overzealous pressing?

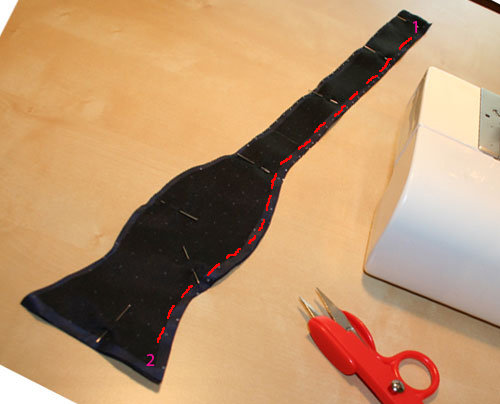
I ran into two major difficulties when making this bow tie. The first one was when turning the bow tie halves right side out. The idea is that you sew around the perimeter of the bow tie, leaving the small end open. You then turn it right side out by feeding it through the gap (Check out the picture below). Sounds easy, no?
Step 2 from the David 008 BurdaStyle Pattern instructions
In reality, this was not as easy as it seems. Not impossible but definitely tricky and I did have to walk away and come back to this at one point. The second difficulty came when I tried to work out how to get the adjustable clips onto the bow tie. This was mostly my own fault as I bought the wrong set of clips (adjuster and hook closure) so the ones I had were too small for the width of the neck band. In case anyones interested you need a 19mm bow tie set like this one from Calico Laine.


In the end I had to fudge the fitting by attaching a piece of elastic to one end and fixing the hook closure to the other. Although it certainly doesn't look pretty and contains some of the worst hand sewing I have ever done, it works.


I forced my husband into modelling it for me but I'm not sure that it quite matches his shirt! 

Overall I am really pleased with how this has worked out for a first attempt. I did leave myself very short of time so this has been rushed at points and whilst there are parts of the construction of the bow tie that are not perfect, I think on the whole it looks great. My father-in-law has proudly worn it to his event this evening, so we will see was that feedback is tomorrow!

Anyway, I hope everyone is enjoying the glorious weather we are having. I'm off to enjoy the remainder of the sunshine with a nice chilled drink and some homemade pizza. 

Monday, 1 June 2015

Pattern or Fabric first?

I've never been the type to fall in love with a fabric. I see fabrics that I really like but I never purchase them without a specific pattern in mind. I definitely choose my patterns first and then search about to find the perfect fabric. Partly this is down to economy and a lack of space for a stash of fabrics.

Most of my fabric purchases are online, although I have a favourite fabric shop, World of Sewing, in Tunbridge Wells. This week I've spent a lot of time doodling about on the internet, online fabric shopping. One of my favourite haunts is Oh Sew Crafty, which has an amazing array of good value fabrics.


I seem to be leaning towards floral fabrics at the moment. In particular I love the yellow and pink floral print with the black background. Once I have worked my way through my current list of projects, I intend to sew some pretty floral dresses and blouses for the summer.

But first I'll have to choose some patterns! Any suggestions?

How do you choose your sewing projects?

Wednesday, 27 May 2015

Things to be thankful for...

Today has been possibly one of the worst days of my life. I went for my 12 week ultrasound today but they couldn't find a heartbeat. The baby was not as developed as it should have been at 12 weeks.

I never intended this blog to really be about anything other than my progress with sewing and knitting. I was so excited yesterday to reach the 12 week mark; I wanted to tell the world. It was so unexpected today to receive such terrible news.  Whilst I always knew that miscarrying was a possibility, I could never have prepared myself to receive such news.

I don't feel that I could have continued blogging without tackling this issue. There will be no maternity or baby clothes to make for a while. My life has changed now and this experience will undoubtedly have repercussions.

I've cried, a lot, obviously. It has been really hard to come to terms with for both myself, my husband and our immediate family. In my mind I was planning on holding my baby this christmas. But I understand that it wasn't meant to be. Something, somehow was not right with this pregnancy and so nature has taken it's course.

I know with time I will heal and we will try again for a baby. In the mean time I am considering how my immediate future has changed. There is a lot in my life for me to be thankful for. Here are some of them.

  • My Wonderful Husband. My rock, my supporter. He was so brave today and I am so thankful to have him by my side. 
  • My family. I have a wonderful support network and I really am thankful to them all. 
  • I can get pregnant. Now that I have been pregnant, even though it didn't work out I know I can get pregnant again. 
  • Finances. Finanically this wasn't the best time for us to have a baby. I can now save and prepare for the future and hopefully our new house will be ready by the time any future babies will come along. 
  • No maternity clothes this summer. I guess the denim Delphine and floral shirt dress will get made after all. 
I'm sure there are more. It might seem strange to some, blogging so soon after such news. But writing about it has been healing for me. I'm trying to be pragmatic and move forward. Thankyou for reading. 

Tuesday, 26 May 2015

Me Made May Fail!

Long time, no post! I've been a busy girlie. But not the good sewing and knitting kind of busy, unfortunately!

My plan was to join in with me made May this year. One year on from when I began dressmaking, I have enough handmade clothes to attempt wearing at least one piece a day. What really happened was that I was so distracted by life that it was half-way through May before I realised. D'oh!

I have the best excuse though ... I'm pregnant.

With the pregnancy making me feel permanently hungover, it was a challenge to get up in the morning and make it to work without losing my breakfast, let alone thinking about blogging my handmade clothing choices. But the good news is, the morning sickness seems to have passed and I'm back to feeling relatively normal. I'm obviously very excited, but also nervous and scared at the same time. At the moment I'm taking every day as it comes.

However, what this does mean is that there is little point sewing clothes. I can't seem to find any enthusiasm for dressmaking when I know that garments might only fit for a short while during my pregnancy. All my plans for denim delphine skirts and floral shirt dresses have gone firmly out the window. Well, at least for the time being.

However, I do have some other sewing projects in the pipe line, which will hopefully be blogged when I find the time!

Hope everyone is enjoying the lovely weather at the moment and are busily planning their summer wardrobes?

xxx


Wednesday, 4 March 2015

Sewing Plans

I once dragged my husband all the way to Fabric Land in Brighton, with the intention of buying some jersey type fabric. In the end I didn't buy any knit fabrics - I totally scared myself out of it by rationalising that I didn't see anything I liked. Everything was either the wrong colour or texture or thickness or too shiny. So come January I decided to make my new years resolution to learn how to sew knits.

After having made this resolution I then did nothing about it. Until last weekend, when I again dragged The Husband to another fabric shop, this time in Tunbridge Wells. And yes, this time I managed to conquer my fear and buy some knit fabric. 

Sewing World has a whole section dedicated to Jersey and fleece fabric so there was plenty to choose from. So here's what I've added to my stash:

1. Royal Blue Jersey


This was the colour I had in mind when I first started to look out for knit fabrics. It's lovely and soft, but I cannot for the life of me remember how much stretch it is. 3%? This is destined to become a basic t-shirt - I figured I would do this first and start simple!


2. Black and White Stripe Jersey


The bolt of fabric was hidden at the bottom of a pile and I had to fairly wrestle it out from underneath. I asked for 1.5m and there was just about that left, so I even gained a little bit extra! It was destined. 
I've already got all the paraphernalia to sew knit fabrics - ball point needles and a twin needle. I've been reading up on various blogs, so the only thing I need now is to get some patterns. 

For the t-shirt, I'm torn between Sewaholic's Renfrew top or SBCC's free Tonic T-shirt pattern. 


I know the Renfrew top has great reviews and I know from previous experience how well designed the Sewaholic patterns are. I'm not so sure about the band around the bottom and seeing as we are coming into Spring/Summer I would like something I can wear with skirts. I like the simple clean lines of the Tonic pattern and think it would suit my needs so I'm leaning towards this pattern right now. 


For the black stripey fabric I'm planning to make a Jersey dress. I have some RTW Jersey dresses and whilst the top is ok, they are soooo short, I can't wear them without leggings. Not great in the hot summer. It is still a toss up betweeen Collette's Moneta Dress or Lady Skater by Kitschy Coo. I love the different sleeve variations of the Lady Skater dress but really like the gathered waistline of the Moneta dress. Decisions, decisions!!

3. Blue cotton


I made The Husband a shirt last October and although he wears it, he would ideally like a more fitted shirt - the sleeves look a bit 90's. So the other day he comes home from work and proudly tells me he has brought himself a shirt pattern from John Lewis. 


The fabric he has chosen is a nice light navy cotton. It is similar to the fabric I bought for the last shirt I made him so I know it will sew and wash nicely. The fabric below is destined for the insides of the collar and cuffs. The Husband picked this out ages ago as he liked it at the time, so me making a second shirt was always in the plans!!  

Fabric for the collars and cuffs!

So lots of sewing planned at the moment! I just need to find the time to put them into action. I am hoping to have a sewing session this Saturday - I really, really want to get started on the green Megan dress I have planned but haven't got round to sewing. If I don't hurry up soon, I won't get any wear out of it this season. At some point I'm planing on updating you all on my knitting adventures too! 

Sunday, 1 March 2015

Red Sorbetto Vest

What a week! I'm definitely back at school and feeling it this weekend. It's been a full on week, complete with additional revision sessions, meeting after meeting and parents evening. I had planned to get at least some cutting out done, but just don't have the energy :( I've had this post ready to go since last week but sadly had no time to actually get round to posting.

So here it is: introducing the red SorbettoVest by Collette!


Since the pattern was straight forward and I have been on a stash busting mission,  I decided to make a (hopefully) wearable muslin out of some red polyester fabric. This fabric was actually left over from the 150m of bunting I made for my wedding. Despite the fact that the quality is not that good and it's slightly see through, it does have quite nice drape which I thought would be good for the Sorbetto pattern.

I pieced together the pattern pieces on the computer and then my husband printed it off on a massive sheet of paper at his work. I must say the thought of having to stick loads of sheets of A4 paper together sounds tiring and I would much rather have The Husband cheekily print them off for me!!

I cut a straight size 4, following the bust measurements. I'm horrifically pear shaped, but usually find that anything that fits my bust correctly generally fits my waist and hips okay.  I followed numerous advice found on the sewing bloggersphere and lengthened the top. To do this I cut to the bottom of the front and back pieces to a size 18 to increase the length, with the added bonus of flaring the bottom of the vest slightly to fit my hips.


One of the things that drew me to this pattern, was the neat seams around the neck and arm holes made using bias binding. Although I have made bias tape for bunting, I have never used it on a garment before.

I decided to make the bias tape from some of the left over fabric by following the tutorial by Collette. This method involves creating a parallelogram by cutting a 10" square into two triangles and then sewing it together. You then draw in 1" lines, sew the two ends together and then cut along the lines to create one strip of bias fabric that can be passed through the tape maker.


All great in theory. I managed to create the strip of fabric easily enough - although my edge seams were so close to the edge of the fabric I had to go back and redo a couple. The issue I had was in actually feeding it into though the tape maker. It was a complete pain, the fabric kept twisting in the tape maker and every time I corrected it after about 10 cm it would twist itself again! So frustrating!! And the iron kept steaming up my glasses!! Arggh.

In the end, I gave up, took a break, watched some telly and came back to it. I finally managed to finish it with some success and then began to construct the vest. The construction process was quick, considering it was the first time I had made proper bias binding and used it to finish necklines. I actually enjoyed the process of finishing the neckline and armholes and like the finished item.  I'm actually happy with the overall finish for a first attempt.

The fit is ok. It fits nicely across the bust, the darts are in the right place. I have worn the vest, tucked into my denim Hollyburn skirt and it was comfy. Not bad for a muslin!!


I will definitely be making more of these. Changes for next time? I would still like to adjust the length, as it's a tad too short for my liking. I agree with other bloggers that the arm cycles are to high - they cut in ever so slightly, so these will need to be lowered.

I also want to try another bias biding method to get more control over where the joins are. If you look at the photo below there are two right next to each other right at the front of the vest which is a bit ugly. I was thinking about joining just straight strips not on the bias, but I get the feeling its the bias that helps the fabric curve around the arm/neck holes. I think I'll try this Piecing Method which is also on the collette website for my next version.


Overall I'm really pleased with my Sorbetto vest. It was relatively quick to make and a nice simple style that is really wearable. I will definitely make another one, so watch this space!!

The instructions for the Collette pattern were really good and straight forward. This got me thinking about other Collette patterns ... here's the others I like:


 I love the Moneta dress and this fits in with my aim of learning to sew knit fabrics this year. The Anise coat looks like the perfect pea coat - but I'll definitely need to improve my sewing skills before attemting this one. I also like the Chantilly dress - I'm thinking of making one for my cousins wedding but it's not till November. Nothing like planning sewing a whole year in advance!!